< How to Paint a Bagel in Watercolor Join
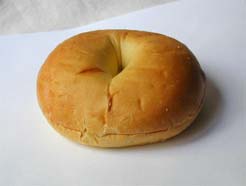
In this free watercolor painting lesson, you will learn how to paint a bagel in watercolor.
Preparation
Materials used:
View info on brushes
9" x 12" cold-press watercolor block
#2B pencil
paints: Red, Yellow, Blue and Burnt Umber
In this watercolor demonstration, I capture the feel of the soft surface of a bagel, the beautiful colors in the bread, and the very fine detail in the crust.
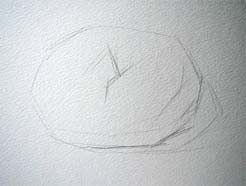
Rough Sketch
With a #2B pencil, using straight lines only, I lightly outline the most essential elements accurately but loosely. Remember, this is only the first step of the process. Do not overdo the drawing, otherwise we could lose the spontaneity and excitement of the painting process. I can also do my sketch using a light paint color instead of a pencil.
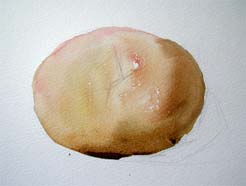
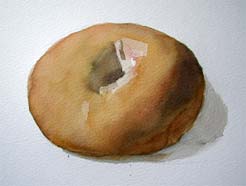
First Color for the Bagel
To set the tone of the painting, I mix red with a fairly large amount of water, keeping in mind that a bagel is a three-dimensional object. So, the front of the bagel is closer to us and will be darker.
Starting from the top, I brush the watery red over 1/3 of the area. Next, I add a little burnt umber to the tip of the brush, and continue to cover most of the remaining area of the bagel. I add even more burnt umber and paint another layer on the darker areas to define the shadow, then let the painting dry. This establishes the basic values of the colors in the bagel.
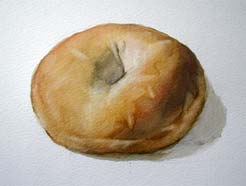
Building up the Value
Two things to keep in mind: when you add a new layer, this is to not to repaint, but to add a little pigment where the first layer did not have enough, much like adding 4+1=5. Sometimes a very light color coat will make a large difference. The second thing to remember is to only do light touches with the brush. Pressing your brush down as you paint the second layer will destroy the first layer. Therefore, I mix a little yellow with red and burnt umber and proceed to wash this over the first layer to enrich the color.
Values Finished
I add more burnt umber to define the shadows. Now the values and overall color definition are completed.
It is too early to start on the details. Keep your mind thinking about the balance of the color temperatures throughout the whole bagel. Make sure you like the value of each of the colors. This is important. We are creating a piece of art, a watercolor painting, not a copy of the subject.
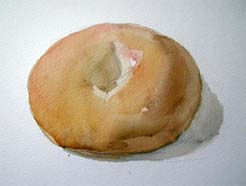
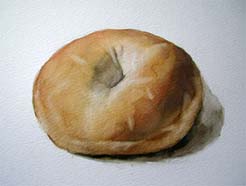
Removing Color to Create Details
One of the most important techniques in my watercolor painting is lifting color. While the second layer of paint is still wet, I rinse the 1-inch flat brush so it is very clean, and then I squeeze most of the water out of it. It should feel just damp. When you squeeze the hair between your fingers, you want to train the brush to develop a very sharp edge at the same time. Now, I use the tip of the brush to lift off some of the paint by moving the brush very slowly and carefully over just one area, rinsing the brush and then forming the sharp edge again frequently. I use this technique wherever I want highlights.
Why paint an area and then partially remove it? It is all about the soft texture effect and the bagel's unique bread feel.
Adding a Cast Shadow
I mix blue color with burnt umber, then paint in the area of the shadow cast by the bagel on the table and let it dry.
This is not the final step of the painting, I let my impression take the lead. I keep my focus on the overall impression, the overall color temperature, and the overall values that I have built up, remembering that a bagel has a different surface texture and material from a yellow apple.
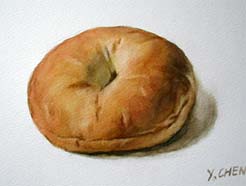
Final Touches
In the last step, I use red and burnt umber to add more details, defining the creases and the line where the bagel has been sliced, and deepening the shadow in the center. In this step, I use more water than paint so that the brush will not disturb the previous layers of colors. This step is the most fun – the painting is coming to completion. My watercolor painting of a bagel now looks like the picture I had in my mind before I began my drawing.