< Painting A Yellow Apple Join
In this free watercolor painting lesson, you will learn how to draw and paint an apple in watercolor.
Preparation
Materials used:
View info on brushes
9" x 12" cold-press watercolor block 140 lb.
HB pencil
watercolor paint: red, yellow, blue, and burnt umber
clean water to clean the brushes
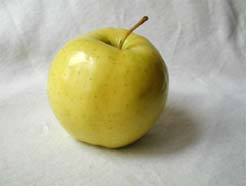
a yellow apple
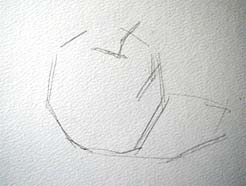
Rough Sketch
In this demonstration, I will show you how to use the different values of colors to make an apple appear three-dimensional. (Definition: the value of a color is how light or dark it is.)
Place the yellow apple where the light source comes strongly from one side. The apple will then have areas of highlight, mid-light and shadow. There will be light reflected from the surface where the apple is placed on and will cast a shadow on that surface.
Sketch the apple and its shadow, using a HB pencil. When I sketch, I use straight lines and try to keep it simple. Think of this as the first step in the entire creation. I don't need to completely define the value in the first step. I will be building the form using different values of watercolor color and painting layer by layer.
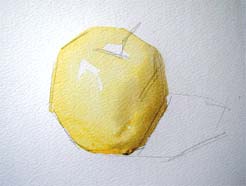
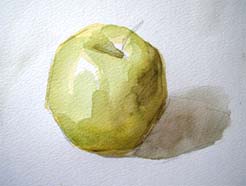
First Layer of Color
I use the three primary colors: red, yellow, and blue, plus burnt umber. Use the white of the paper for the highlights – do not paint over them. Mix yellow with water, then apply to the lighter side of the apple. Then, mix burnt umber with a similar amount of water and apply it to the dark side of the apple. Let this dry before continuing.
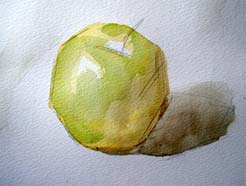
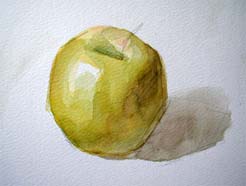
Second Layer of Color
When the first layer is dry, mix a cool grey color using all three primaries. Adding more blue color to the mix will make the color appear cooler. Paint the apple’s shadow on the surface of the table. Hold your brush sideways, so that the brush tip (with its heavier load of paint) is touching the side of the shadow nearest you. The shadow nearest you should be darker, then fade gently to a lighter value as it goes away from you. Then, mix a green color (yellow and blue) and apply onto the light area of the apple. Be sure to not let these two new colors touch each other. Let everything dry.
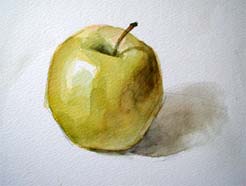
Building up the Value
When the painting is dry, apply a layer of green color wash to the dark side of the yellow apple and in the hollow where the stem is attached.
Leave some areas untouched, these areas will be for the highlights. At this step, it is important to keep your mind on the overall look. Keep everything alive. Each step has a goal toward building up the values.
Add Contrast to the highlights
Now that I have built up the color values, the apple has more life. In the last step, I add a touch of the complementary color (a red-orange) to the lighter side of the apple. (Definition: Complementary Colors are two colors that are positioned opposite each other on the color wheel.) The complementary color to use here is yellow mixed with red. Then you can add just a bit of red for the top.
Painting the reflected light and adding the darkest points
Clean your brush before you apply clean water to wash away some of the paint color at the bottom of the apple to show light reflected from the surface under and around the apple. Be sure to brush softly, take your time, and not damage the watercolor paper surface.
Then use the tip of the brush to paint into the apple stem and its shadow area.
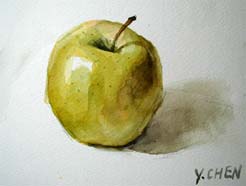
Add texture
Are you satisfied with the value and color balance of the painting? Now is the time to add the final touch - texture. If your apple has speckles, make little dots of brown where the speckles appear. Sign your name on your beautiful watercolor apple painting!